Mastering Twilight Real Estate Photography
A complete guide to twilight real estate photography. Learn the gear, settings, and editing techniques that create stunning, high-impact property photos.
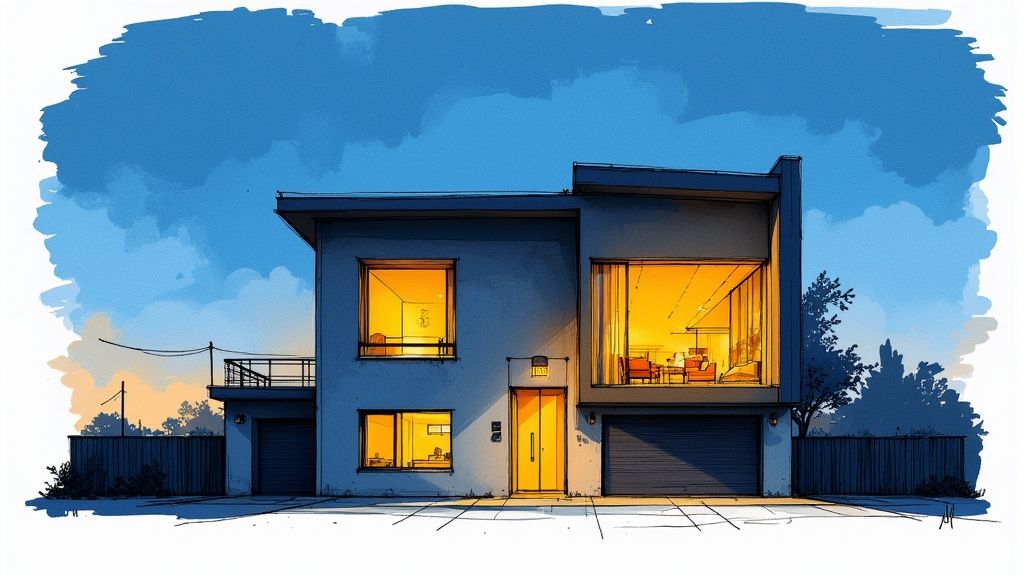
Twilight real estate photography is all about capturing a property during that perfect slice of time—the "magic hour" right after the sun dips below the horizon. It's that beautiful moment when you can blend the warm, inviting glow from inside the home with the deep, cool blues of the evening sky.
The result? A dramatic, almost luxurious image that stops potential buyers dead in their tracks while they're scrolling. This isn't just about taking a pretty picture; it's a powerful sales tool.
Why Twilight Photos Sell Homes Faster
In a jam-packed online market, you have just a few seconds to grab a buyer's attention. Let's be honest, standard daytime photos, while necessary, can all start to look the same after a while. Twilight shots shatter that monotony. They create an instant emotional connection that goes way beyond just showing off room sizes and floor plans.
What you're really selling is a feeling—the idea of coming home to a warm, safe, and inviting space. That beautiful contrast between the glowing interior and the calm evening sky just screams peace and comfort. This emotional pull is incredibly strong and helps buyers see themselves living in the home, not just looking at a property.
The Psychology of Light and Color
The real magic behind a great twilight photo comes from its color contrast. You have the warm, golden light pouring out of the windows, which we naturally associate with happiness and comfort. Then you have the rich blues and purples of the sky, which bring a sense of stability and calm. This combination is a visual showstopper and immediately signals that this is a high-end, premium property.
This perception of luxury often leads to a higher perceived value. When a home looks like it could be on the cover of an architectural magazine, buyers are more likely to view it as a premium asset. That can absolutely influence their offers and how quickly they want to book a showing.
Boosting Online Engagement and Views
In a market where most listings lead with daytime photos, a striking twilight hero image earns more clicks and longer attention from buyers scrolling through search results. It is the kind of shot that makes a listing pause-worthy instead of forgettable.
Twilight photography isn’t just another expense; it’s a strategic marketing investment. It turns a simple listing into a compelling story, attracting more serious buyers and paving the way for a faster, more profitable sale.
Ultimately, these images do more than just highlight a home's lighting. They create a powerful and lasting first impression that makes your listing memorable. This boost in engagement is the first crucial step to getting more showings, stronger offers, and closing the deal faster than the competition.
Your Essential Gear and Camera Settings
You don’t need to haul a studio's worth of gear out to a property to nail a stunning twilight shoot. The real secret is focusing on a few key pieces that give you stability and control. Once you have that, it's all about dialing in the right settings to master the tricky low-light conditions.
Honestly, success in twilight real estate photography is far more about technique than having the priciest camera body. It’s about knowing how to make the gear you already own work for you to capture those crisp, dramatic shots that make a buyer stop scrolling.
The Non-Negotiable Gear Checklist
Don't get bogged down by those long, intimidating gear lists online. When it comes to a twilight shoot, you really only need a handful of core items. These are the tools that do the heavy lifting.
-
A Solid Tripod: This is, without a doubt, your most important tool. Twilight shots need long shutter speeds to soak in all that beautiful ambient light. The tiniest camera shake will turn your photo into a blurry mess. A sturdy tripod is absolutely non-negotiable for getting tack-sharp images.
-
A Camera with Manual Mode: You don't need the latest model. Any DSLR or mirrorless camera that lets you independently control ISO, aperture, and shutter speed is all you need. If you're looking for some direction, our guide on choosing the best camera for real estate photography has some great starting points.
-
A Wide-Angle Lens: To get that grand, sweeping shot of the property's exterior, a wide-angle lens is a must. Something in the 16-35mm range (on a full-frame camera) lets you fit the entire home and its landscaping into one powerful frame.
-
A Remote Shutter Release: This little accessory is a game-changer and it won't break the bank. Even the gentle act of pressing the shutter button can cause a micro-shake, ruining a long exposure. A remote, whether it's a simple cable or wireless, completely eliminates that risk.
Mastering Your Manual Camera Settings
Once you’re set up, it's time to take full command of your camera. Auto mode just can't handle the dynamic lighting of a twilight shoot; it gets confused trying to balance the bright interior lights with the darkening sky. Manual mode is where you'll find your magic.
The goal is to find the perfect harmony between the three core settings of the "exposure triangle." For twilight, we can make this much simpler by locking in two of those settings and only adjusting the third.
Pro Tip: Keep it simple. Set your ISO and aperture first. Then, during that brief "magic window" of twilight, all you have to worry about is adjusting your shutter speed to get the perfect exposure. This makes your workflow so much faster.
Your Go-To Twilight Settings Formula
Use these settings as your starting point, and then tweak them based on the scene in front of you. This approach gives you a reliable foundation for capturing professional-quality images every time.
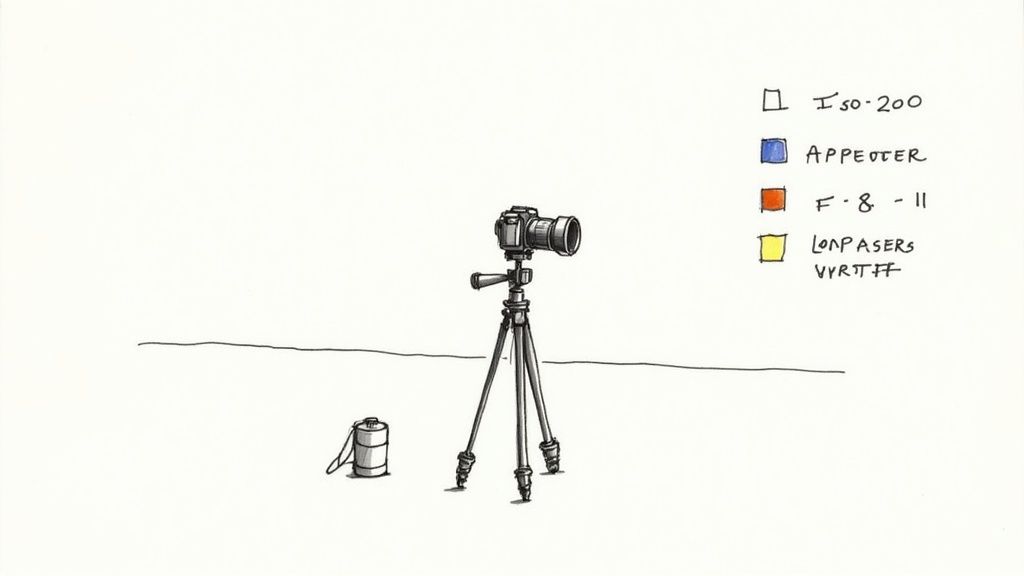
1. Set Your ISO to its Lowest Native Value ISO is your sensor's sensitivity to light. To get the cleanest, most detailed images possible, you want to set your ISO as low as it will go—usually ISO 100 or 200. Because you're on a tripod, there's no need to crank up the ISO to compensate for the darkness.
2. Lock in Your Aperture for Maximum Sharpness Your aperture (or f-stop) controls how much of your scene is in focus. For an exterior shot, you want everything sharp, from the mailbox at the curb to the shingles on the roof. An aperture between f/8 and f/11 is the sweet spot for that deep depth of field and edge-to-edge sharpness.
3. Adjust Shutter Speed to Control Brightness With your ISO and aperture locked, the shutter speed is the only thing you need to touch. It controls how long your camera's sensor is exposed to light. As the sky fades from blue to black, you'll need to use a slower and slower shutter speed—this could range from a fraction of a second to 15-30 seconds or even longer—to get a bright, perfectly exposed shot. And that is why the tripod is your best friend.
Setting the Stage for the Perfect Shot
Let's be honest, a killer twilight photo doesn't just happen. It's carefully crafted long before the camera even comes out of the bag. The absolute best twilight real estate photography sessions are built on a rock-solid foundation of planning and smart staging. This is where you transform a simple house into a buyer's dream home.
This isn't just about a quick clean-up. It's about orchestrating the property's lighting and finding that perfect angle to create an atmosphere of pure luxury and comfort. Get this part right, and not only will your shoot go smoother, but the final images will have a much bigger impact.
Mastering the Glow
The heart and soul of any twilight shot is that beautiful dance between the home's warm, artificial lights and the cool, fading light of the evening sky. To get that signature glow, your first job is to light the house up from the inside out.
Your mission? Turn on every single light.
Go through the entire property and flip every switch you see:
- Interior Lights: Think lamps, chandeliers, overhead fixtures, and even the under-cabinet lighting in the kitchen. Each one adds another layer of warmth that will spill out through the windows.
- Exterior Lights: Don't skip the porch lights, garage sconces, or any landscape uplighting. These are key for defining the property's edges and adding some much-needed depth.
- Pools and Water Features: If there's a pool, spa, or fountain with its own lighting, get it turned on. The reflection on the water creates a stunning, high-end look that’s hard to beat.
Lighting everything up this way makes the home feel alive and incredibly inviting, especially against the deep, dramatic blues of the evening sky. If you're looking for more ideas to get a property camera-ready, our guide on home staging tips has a ton of great advice.
Finding the Right Angle
Once the lights are on, it's all about composition. The angle you choose can completely change the feel of a photo. A straight-on shot often looks flat and boring, so I always recommend walking the property to find something more dynamic.
Look for natural leading lines—a curved driveway, a stone walkway, or even a fence line can work wonders. These elements act like a visual pathway, pulling the viewer’s eye right to the front door and making the whole scene feel more engaging. You want to frame the shot so the house is the star, perfectly balanced against that gorgeous sky.
The goal is to tell a story with a single frame. A great composition makes a buyer feel like they are walking up to their future home, not just observing a building.
The payoff for this effort is real. Listings with professional twilight photos just feel more premium, and that polished, magazine-cover look helps a property command attention and stronger offers in a crowded market.
Nailing the Timing
In twilight photography, timing isn't just important—it's everything. You're in a race against the setting sun to capture that perfect, fleeting balance of light. This "magic window," often called the "blue hour," is incredibly short.
You're looking for that sweet spot that happens about 20 to 30 minutes after sunset. This is when the sky glows with rich blues and purples, but there’s still just enough ambient light to see the home's architectural details. My advice? Get there early, have your gear set up, and be ready to shoot the second that window opens. It closes just as fast as it arrives.
Getting the Shot: Your On-Site Workflow
Alright, the property is prepped, the lights are on, and the sky is starting to put on a show. This is game time. All that planning comes down to these next few moments, and you have to be ready. The perfect twilight light doesn't stick around for long, so having a methodical, efficient process is non-negotiable.
The one technique that truly separates the pros from the amateurs in this scenario is exposure bracketing. Forget trying to capture everything in one shot—the dynamic range is just too wide. Instead, we'll take a series of photos at different brightness levels. This method ensures we have all the visual information needed to blend them into one stunning, perfectly lit image later on.
This handy visual guide breaks down the essential steps for a successful shoot, from turning on the lights to capturing the final image during that perfect "magic window."
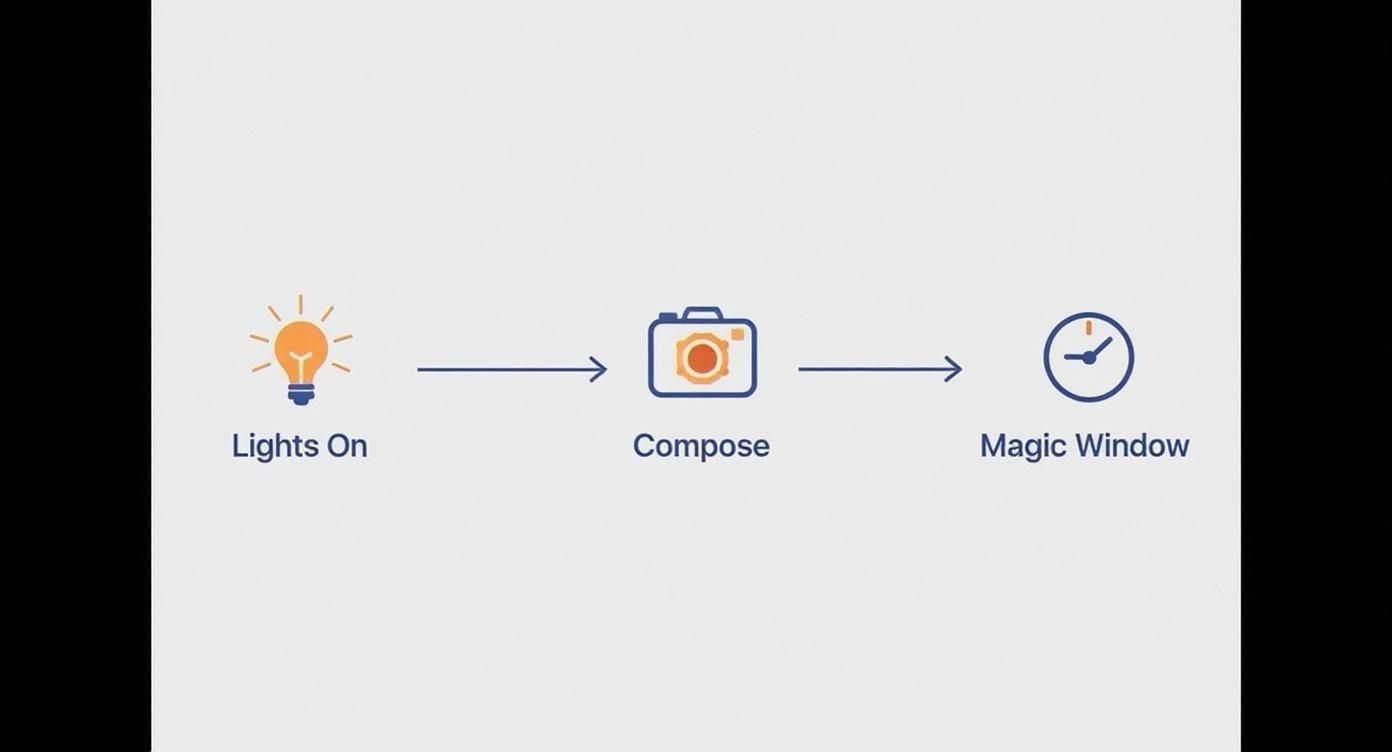
As you can see, everything from the staging and composition to the timing is connected. Nailing this process results in that iconic twilight shot where the warm interior lights pop against the cool, deep blue of the evening sky.
Setting Up Your Exposure Brackets
Think of exposure bracketing as your ultimate safety net. It’s how you guarantee you'll capture every detail, from the brightest porch light filament to the darkest shadows in the garden. Most modern cameras have a built-in Auto Exposure Bracketing (AEB) feature that makes this incredibly quick and easy.
I always go for a 5-shot bracket. This gives you a fantastic range of light to work with, which you'll be thankful for when dealing with the high contrast of a twilight scene. Your camera will fire off:
- One "base" or properly exposed shot (0 EV).
- Two underexposed shots (-2 EV and -4 EV) to get all the rich color from the sky and keep the artificial lights from blowing out.
- Two overexposed shots (+2 EV and +4 EV) to capture all the details hiding in the shadows on the house and in the landscaping.
To get this set up, just dive into your camera’s menu and find the AEB setting. Choose 5 exposures and set the increment to 2 stops (which looks like "2.0" on most cameras). Pair this with your camera's burst mode and a remote shutter, and you can capture all five frames in a second or two, locking in the light before it has a chance to change.
Here's a pro tip from my own workflow: I take my first set of bracketed shots the moment the sky starts to look great to my naked eye. Then, I'll take another full set every 3-5 minutes until the sky is almost completely dark. This guarantees I won’t miss that single perfect moment where the ambient and artificial light are in perfect harmony.
Add Some Magic with Light Trails
Looking for a way to give your twilight shots that extra "wow" factor? Capturing the light trails from passing cars is a fantastic technique that adds a sense of energy and luxury. It makes the home feel connected to a vibrant, living neighborhood.
To pull this off, you’ll switch from bracketing to a single long exposure. After you've captured your main bracketed images of the house, don't move your camera an inch.
Here’s the process—it's simpler than you think:
- Go Full Manual: Keep your ISO locked at 100 and your aperture around f/11 to maintain sharpness.
- Slow Down the Shutter: This is where the magic happens. You'll need a much longer shutter speed, usually somewhere between 10 to 30 seconds. The exact time depends on how fast traffic is moving and how many trails you want to create.
- Time It Right: Use your remote to open the shutter just before a car enters the frame and close it right after it leaves.
What you're left with is a single photo that contains just those beautiful, flowing streaks of light. In post-production, you can easily layer this image with your perfectly exposed shots of the house and sky to create a truly dynamic and compelling composite.
Taking Twilight Photography to the Skies with Drones
Why should the ground have all the fun? Applying these same principles with a drone can produce absolutely breathtaking aerial shots that show off the entire property and its surroundings. A twilight drone shot is often the "hero image" that makes a high-end listing truly stand out.
A drone is just a camera in the sky, so all the same rules apply. You need to control the exposure and, most importantly, keep it steady. Thankfully, modern drones from manufacturers like DJI have incredible cameras and built-in bracketing features that make this easy.
When you're flying for twilight shots, keep these points in mind:
- Stability is Everything: You don't have a tripod, but a drone's gimbal and GPS are designed for rock-solid stability. Fly only on calm days with little to no wind to ensure your shots are tack-sharp.
- Use AEB Mode: Just like on the ground, set up a 3 or 5-shot bracket. This will capture the full dynamic range from the glowing windows of the home, the streetlights below, and the colorful sky.
- Always Shoot in RAW: This is non-negotiable for drone work. RAW files give you the maximum amount of data to work with, allowing you to pull details out of the shadows and fine-tune your colors perfectly.
Combining a stunning aerial view with the drama of twilight lighting creates an image that doesn't just get noticed—it elevates the entire feel of the property.
Editing and Blending for a Natural Look
Getting the shots on-site is really only half the job. The true magic in twilight real estate photography happens back at the computer, where you’ll weave those raw exposures into one incredible image. This is where the artistry comes in—balancing the light, dialing in the colors, and creating that signature dramatic-but-real look.
The entire goal is to blend your bracketed shots into a High Dynamic Range (HDR) photo that doesn't feel over-processed. A great edit feels completely natural. It pulls you into the scene without distracting you with weird halos or super-saturated colors that just don't exist in the real world. It's a delicate balance, but totally achievable once you have a solid workflow.
Creating the HDR Base Image
First things first: you need to merge your bracketed exposures. Whether you're a fan of Lightroom, Photoshop, or another editing suite, the general idea is the same. You'll grab your 5-shot sequence, from the darkest exposure to the brightest, and let the software's HDR tool do the initial heavy lifting.
I’ve found these settings are the best starting point for a clean merge:
- Auto-Align: Always check this box. Even with a rock-solid tripod, tiny vibrations can happen. This feature makes sure every single pixel lines up perfectly.
- Auto-Tone: I always leave this one unchecked. You want total control over the tones and colors, and the software’s automatic adjustments are usually way too heavy-handed.
- Deghost Amount: Start with "Low" or "Medium." This is your best friend for fixing any motion blur from things like tree leaves rustling between shots.
This first step gives you a somewhat flat-looking but incredibly detailed 32-bit DNG file. This file holds all the light information from your five separate photos—from the deep blues of the sky to the subtle textures hiding in the porch shadows. Think of it as the perfect digital canvas to start painting on.
Balancing White Balance and Color
With your merged HDR file ready, it's time to get the colors right. Honestly, this is one of the most crucial parts of making a twilight photo look natural. You're aiming to keep that warm, inviting glow from the interior lights while making sure the evening sky holds onto its rich, cool blue tones.
A common mistake is to just slide the white balance for the whole image one way or the other. Do that, and you’ll either get sterile, yellow-looking interior lights or a beautiful blue sky that turns into a muddy gray mess.
The secret is to use local adjustments. With a brush or gradient filter, you can selectively tweak the white balance in different parts of the photo.
I almost always brush over the windows with a warmer temperature, then use a separate gradient filter on the sky to cool it down, pushing it more toward blue and magenta. This technique is how you get that incredible color contrast that makes twilight photos so captivating.
Refining the Details with Targeted Adjustments
Once your base colors are locked in, it’s time for the finishing touches that make the image truly shine. This is all about small, targeted edits, not big global changes. For a great rundown of different editing tools, you can check out our guide on the best real estate photography editing software.
Here are the final adjustments I make on every twilight image:
- Noise Reduction: Low-light shots can get a bit noisy, especially in the dark sky. Apply just enough noise reduction to smooth it out, but try to keep it localized so the rest of the image stays crisp.
- Targeted Sharpening: Don't just crank the main sharpening slider. Use a sharpening mask to apply it only to the hard edges of the home's architecture. This keeps the sky soft and makes the property itself look incredibly sharp without adding ugly grain.
- Lens Corrections: Every lens warps the world a little bit. Use your software’s built-in profile corrections to straighten out vertical lines and get rid of any corner darkening. This makes the home look true-to-life.
- Subtle Color Grading: A final, light touch of color grading can really tie everything together. I often add a hint of blue to the shadows and a tiny bit of orange to the highlights to boost that natural warm-cool contrast.
While these tips are specific to twilight, learning how to edit real estate photos in general will give you a solid foundation for any shoot. Mastering these post-processing skills is what separates a good photo from a great one that grabs a buyer's attention and won't let go.
Answering Your Top Questions About Twilight Photography
If you're thinking about adding twilight photos to your real estate marketing, you probably have a few questions. It makes sense. It’s a specialized service, and knowing the logistics around cost, scheduling, and what to expect is crucial. Let's walk through some of the most common questions agents and photographers have.
Getting these details ironed out ahead of time just makes everything go smoother for everyone. It’s all about making a smart call that will really pay off for your listing.
So, How Much More Does a Twilight Shoot Cost?
Let's get right to it: yes, twilight shoots cost more than your standard daytime session. And there's a good reason for the premium.
A photographer can often juggle several shoots in a single day. But twilight is different. That perfect "magic hour" light is a fleeting window, meaning a photographer can realistically only schedule one twilight shoot per evening. That exclusivity, plus the more technical on-site work and detailed editing required later, is what you’re paying for.
So what's the damage? Prices will always vary by market and the photographer's experience, but you can typically expect a twilight add-on to run between $150 and $300 on top of your daytime package. This usually gets you a handful of show-stopping exterior shots that are meticulously edited.
Think of it less as an expense and more as a direct investment in your marketing. A killer twilight photo often leads to more clicks, more saves, and more showings—delivering a great return on that initial cost.
What Happens If It Rains or the Sky Is Just Gray?
This is a big one. A dreary, overcast day can certainly kill the vibe you’re going for. The ideal twilight shot needs that pop of color in the sky to really sing.
Most pros have a simple weather policy. If the forecast is looking grim, they'll be in touch to reschedule for the next clear evening, usually at no extra cost. It's always a good idea to chat about this policy upfront so everyone's on the same page.
But hold on—don't cancel at the first sign of clouds! A sky with some scattered clouds can actually be far more dramatic and interesting than a perfectly clear one. As the sun sets, it can light up the clouds from underneath, creating incredible textures and deep colors that add a ton of mood to the final image. A seasoned photographer knows how to use these conditions to their advantage.
Are Twilight Photos Just for Luxury Homes?
Not at all. While twilight photography has become a signature look for high-end properties, its power to create an emotional connection isn't reserved for multi-million dollar estates. A beautifully captured twilight photo can make any home feel special.
The whole point is to help a potential buyer imagine themselves coming home to this warm, inviting place at the end of the day. That feeling works just as well for a cozy suburban bungalow as it does for a sprawling modern mansion. If the property has nice outdoor lighting, a pool, a fire pit, or even just a welcoming front porch, a twilight shoot will make those features shine.
In a crowded market, a single, powerful twilight photo can be the very thing that stops a buyer from scrolling and gets them to click on your listing.
How Long Does the Actual Shoot Take?
You might be surprised at how quick and focused the on-site time is. The photographer usually shows up about 30-45 minutes before sunset. They’ll use this time to walk the property, scout the best angles, and get all their gear set up. This prep is critical because once the light starts to fade, things move fast.
The actual shooting happens in a very narrow window, lasting only about 20 to 30 minutes. This is the "blue hour," and the photographer will be working efficiently to capture bracketed shots from a few key vantage points before that gorgeous light is gone. All told, you can expect them to be on-site for about an hour to an hour and a half.
This tight timeline is exactly why the home has to be 100% ready before the photographer arrives. All interior and exterior lights on, yard tidy, patio furniture arranged—there's simply no time for last-minute fixes once the show starts.
Ready to elevate your listings but don't have time for complex shoots or editing? Pedra uses AI to turn your existing daytime photos into stunning virtual twilight images in a single click—no tripod, no blue hour, no post-production. You can also virtually stage empty rooms and enhance photo quality from the same platform. Try Pedra and create breathtaking property visuals in minutes.

Related Posts
7 Ways AI for Real Estate Is Transforming the Industry in 2026
Explore how AI for real estate is reshaping the market in 2026: valuation, predictive analytics, vir...
Digital Real Estate Agency: A 2026 Guide to Transforming Your Brokerage
Run a digital real estate agency that closes faster: tools, automation, visual presentation and a st...
8 Facebook Marketing Ideas for Real Estate in 2026
Explore our top 8 Facebook marketing ideas for real estate in 2026. This guide covers paid ads, orga...
Real Estate Floor Plans 2026 - Win More Listings
Master real estate floor plans to win listings and engage buyers. Learn to create and use 2D and 3D ...
10 Home Exterior Renovation Ideas to Boost Curb Appeal in 2026
Discover 10 home exterior renovation ideas to boost curb appeal in 2026, from siding and stone accen...
Home Staging Tips: 8 Ways to Sell a Home Faster in 2026
Looking to sell a property faster and for top dollar? These eight essential home staging tips will s...