Virtual Tour of House Plans The Ultimate Guide
Create a stunning virtual tour of house plans from 2D blueprints. This guide covers 3D modeling, virtual staging, and publishing for immersive walkthroughs.
A virtual tour of house plans takes a flat, static blueprint and turns it into a living, breathing 3D walkthrough. It’s a game-changer that lets potential buyers, builders, and designers step inside a home and feel its layout before a single foundation is poured. This tech bridges the gap between a 2D drawing and the reality of a finished space, making abstract concepts feel completely tangible. With Pedra, you can create an interactive virtual tour and bring those plans to life.
Why You Can't Afford to Skip Virtual Tours for Your House Plans
Relying on old-school, two-dimensional blueprints isn't just dated—it's a missed opportunity. Let's be honest, most clients struggle to visualize a space from lines on a page. This leads to confusion about room size, how spaces connect, and the overall feel of the home. A virtual tour cuts right through that confusion.
This is about more than just a cool visual trick; it’s about sparking an emotional connection. When someone can "walk" through their future home, they start to picture their life unfolding there. They can see where they'll drink their morning coffee as the sun comes in, or mentally arrange their furniture in the living room. It makes the project feel real.
Gaining a Serious Competitive Edge
In a market saturated with images, an interactive virtual tour makes you stand out. It shows you're committed to giving your clients clarity and confidence, which helps everyone make smarter, more informed decisions right from the start. Getting this clear vision early on can save a ton of headaches and prevent expensive changes down the road.
The numbers don't lie. Research shows that a whopping 67% of home buyers now expect to see a virtual tour with a listing. More than that, these interactive walkthroughs can keep people on a website for 5 to 10 times longer than a simple photo gallery. If you want to dive deeper, you can explore more real estate virtual tour statistics to see just how big the impact is.
From Blueprint to "Being There"
Tools like Matterport have set the standard for creating these incredibly detailed digital twins of a property. The interface, like the one you see below, is designed to be completely intuitive, letting users move from room to room as if they were really there.
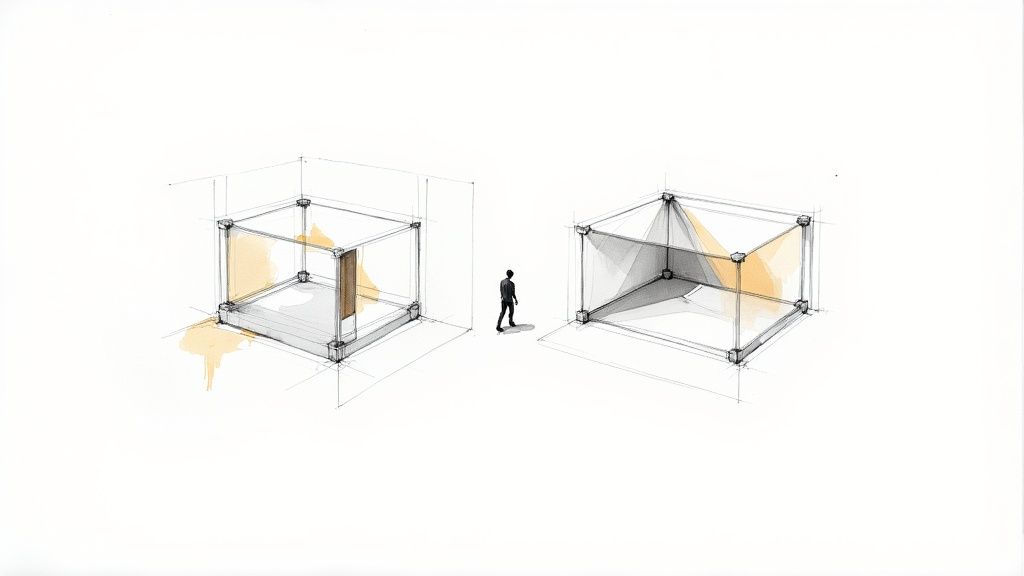
It’s this combination of seamless navigation, handy floor plan views, and even measurement tools that truly shows off a design's potential. It's the closest you can get to walking through a finished home before it even exists.
Getting Your Blueprints Ready for the 3D Leap
The whole process of turning a flat floor plan into an immersive virtual tour starts with one thing: your blueprints. This is the foundation for everything that follows. A vague napkin sketch isn’t going to fly; if you want an accurate and impressive 3D model, your plans need to be crystal clear.
Think of your 2D plans as the DNA for the final walkthrough. If the code is fuzzy or incomplete, the end result will feel off.
Before any software gets involved, you need to make sure your plans are builder-ready, not just a rough concept. This means every single important detail is right there on the page. A 3D artist or an AI tool can't guess at dimensions, so your blueprints must have precise measurements for every wall, room, and hallway. Without them, you're just asking for a model with weird, distorted proportions, which pretty much defeats the purpose.
The Make-or-Break Details for 3D Modeling
This isn't just about length and width. I’ve seen projects get sidetracked because a few key details were missing from the initial sketches.
Before you hand anything off for conversion, do a quick check to make sure your plans have these non-negotiable elements:
- Spot-On Dimensions: Every wall length, room size, and closet depth needs a clear label. No ambiguity.
- Ceiling Heights: You have to specify the height for each level. Is it a standard 8-foot ceiling or a soaring 12-foot one? Are there vaulted or sloped ceilings? This dramatically changes the feel of a space.
- Window and Door Placements: Mark the exact location, size, and type (like sliding glass or a casement window) for every single opening. This is absolutely critical for getting the natural light right in your 3D renders.
- Structural Bones: Don't forget to note the location of columns, support beams, or any other fixed features that are part of the interior space.
Overlooking these things is the most common pitfall I see. Imagine a potential buyer falling in love with a virtual tour that shows 9-foot ceilings, only to find out the actual plan calls for 8-foot ceilings. That kind of mistake leads to disappointment and expensive do-overs. If you're drawing your plans from scratch, this guide on how to draw a floor plan will get you started with the right level of detail.
Pro Tip: I always recommend adding a "material legend" or just simple notes right on the plan. Something like "hardwood floors in living room" or "quartz countertops in kitchen" gives the 3D artist the context they need to make sure the textures in your virtual tour match your vision.
Picking the Right File Format for a Smooth Handoff
Once your plans are detailed and you’ve given them a final check, the last step is to save them in a format that’s easy to work with.
You can use a high-resolution PDF or JPEG, but honestly, they aren’t the best option. These are just flat images, which means the 3D modeler has to manually trace over everything. That’s not only time-consuming but also opens the door for small inaccuracies to creep in.
The industry standard is a DWG (Drawing) or DXF (Drawing Exchange Format) file. These are the native files from CAD programs like AutoCAD. Because they're vector-based, they contain precise geometric data that 3D modeling software can read directly.
Providing a DWG file is the single best thing you can do to ensure a fast, accurate start to creating your virtual tour of house plans. It makes for a seamless handoff and a much better final product.
Choosing Your Path From 2D Plan to 3D Model
You’ve got a clean, detailed floor plan. Now what? This is where the magic happens, but you're facing a fork in the road. Turning that flat drawing into a three-dimensional space that someone can actually walk through virtually is the goal, and the path you choose here will impact everything—your budget, your timeline, and the final polish of the tour.
Fundamentally, you have two options. You can either hire a professional 3D artist or a specialized agency to handle it for you, or you can roll up your sleeves and go the Do-It-Yourself (DIY) route with some surprisingly powerful software.
Hiring A Pro vs. Going DIY
The "right" choice really boils down to your specific project needs. If you’re dealing with a complex architectural design full of custom features, bringing in a professional is often the smart move. Their expertise in interpreting technical drawings and creating photorealistic models is worth the investment, especially for high-end marketing materials.
On the other hand, for more standard house plans or if you enjoy having hands-on creative control, DIY software is a fantastic option. Modern tools have become incredibly user-friendly, letting you trace your 2D plans, pull up walls, and pop in windows and doors without needing a degree in computer graphics. It’s a much more affordable and flexible approach.
This infographic is a great gut-check to see if your blueprint is ready for a smooth 3D conversion, highlighting the key details you need in place.
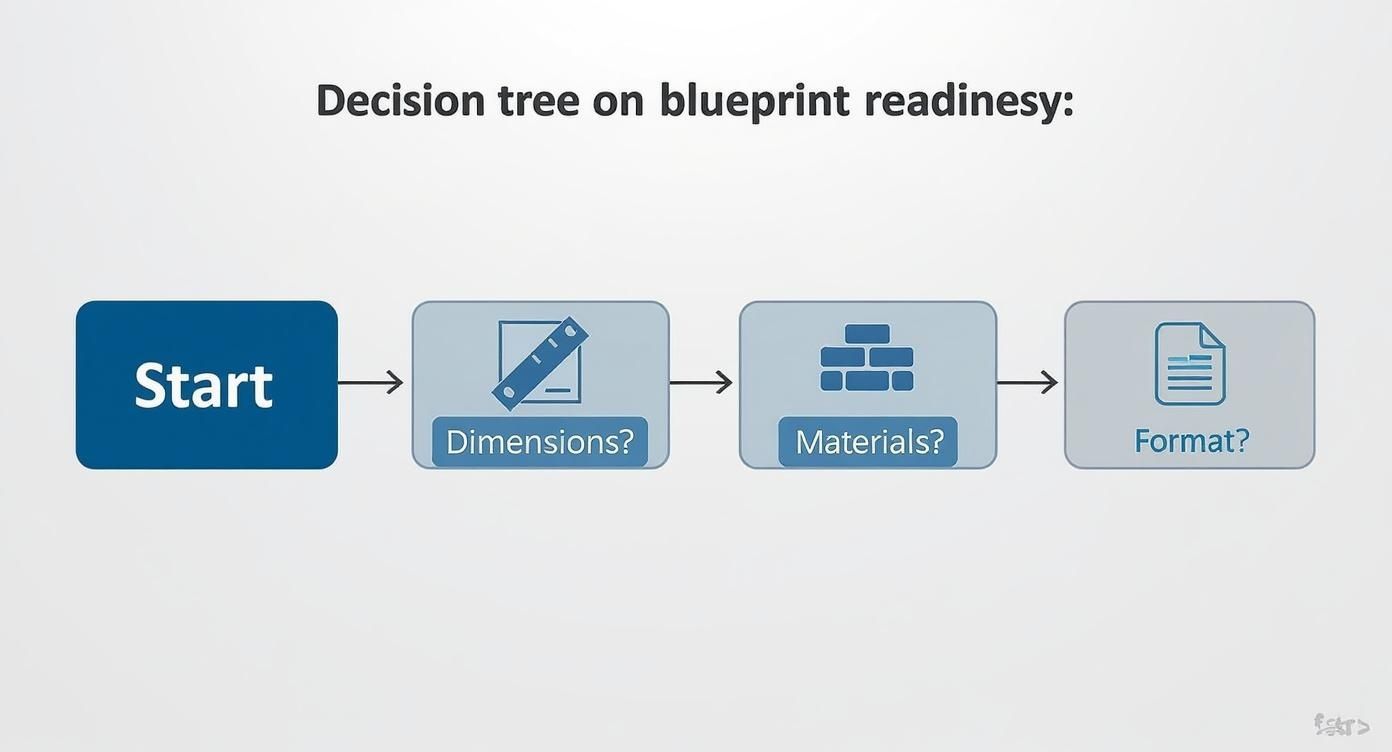
As you can see, a detailed and complete plan is your best asset. It makes the entire process faster and more accurate, whether you're doing it yourself or handing it off to an expert.
Comparing 3D Modeling Approaches
To make the decision easier, let's look at the practical side of things. Creating a virtual tour of house plans is always a trade-off between cost, time, and the level of skill required.
Here's a quick comparison of what to expect from each method:
| Method | Estimated Cost | Typical Timeline | Required Skill Level |
|---|---|---|---|
| Hiring a Freelancer | $500 - $2,500 | 1-2 weeks | None |
| Using a 3D Agency | $2,000 - $7,000+ | 2-4 weeks | None |
| DIY Software | $20 - $100/month | 1-3 days | Beginner to Intermediate |
| Advanced CAD Software | $1,000+ (license) | 1-5+ days | Advanced / Professional |
The numbers speak for themselves—the DIY route offers huge cost savings. For those just starting, platforms like Floorplanner or SketchUp are great entry points. For seasoned pros who need more firepower, tools like Chief Architect or Revit deliver incredible detail, but they come with a significant learning curve and price tag.
Key Takeaway: If you need a flawless, professional result fast and don't want to get bogged down in software, hire an expert. But if you're working with a tighter budget and want to steer the creative direction yourself, modern DIY tools are more than capable of producing a stunning 3D model.
Breathing Life into Your Model with Staging and Textures
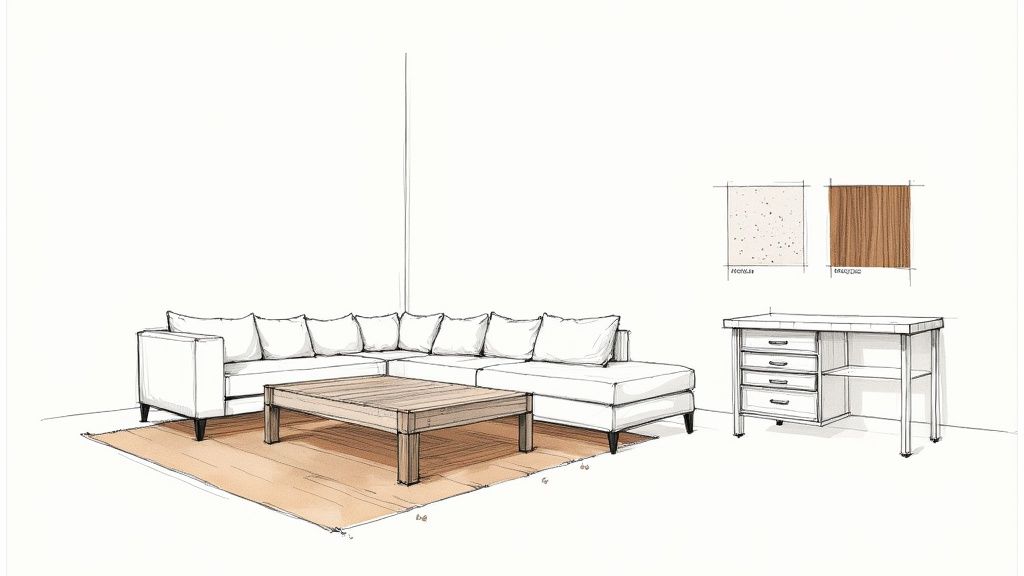
An empty 3D model is just a shell. It shows you the bones of a house, but it doesn't have the soul that makes someone fall in love with it. This is where the real magic happens—transforming a cold, digital space into a warm, inviting home with textures and smart virtual staging.
It all starts with applying realistic materials. This isn't just about picking a paint color; it's about capturing the specific feel of the final build. Think about the cool, veined marble you envision for the kitchen island or the rich grain of oak for the hardwood floors. These small details are what separate a basic render from a photorealistic image that feels truly believable.
The Art of Strategic Virtual Staging
Let's be clear: virtual staging is way more than just plopping a few digital couches into a room. It’s a strategic process. You're defining how each space functions, creating a natural flow from one room to the next, and—most importantly—sparking a potential buyer's imagination. When people can see a furnished space, they stop thinking about square footage and start picturing their life unfolding there.
To get this right, you can use technologies like AI virtual staging to your advantage. These tools are great for suggesting layouts and decor styles that actually match the home's architecture, keeping the design both aspirational and authentic. The point isn't to trick anyone; it's to help them see the incredible potential hidden in an empty floor plan.
And this isn't just a gimmick—it's what the market wants. The global virtual tour service market hit USD 237 million in 2024 and is expected to climb to USD 364 million by 2031. That growth is a direct result of people demanding better, more engaging ways to view properties from anywhere.
Common Staging Mistakes to Avoid
Even with the best tools, it's easy to make a few missteps with virtual staging. Your goal is to make the home feel spacious and desirable, not cluttered or just plain weird.
Here are a few classic pitfalls I see all the time:
- Oversized Furniture: A massive sectional might look amazing in a showroom, but if it swallows the living room whole, it actually makes the space feel smaller.
- Clashing Styles: Trying to furnish a rustic farmhouse plan with ultra-modern pieces creates a jarring look that just confuses people. Stay consistent.
- Ignoring Flow: Never place furniture where it blocks a natural walkway or makes a room feel awkward to move through.
The best virtual staging is the kind you barely notice. It should guide your eye through the space and highlight the home's best features without making you focus on the furniture itself. You're selling the house, not the digital sofa.
Platforms like Pedra are designed to make this whole process easier by using AI to turn your stark 3D model into a beautifully staged home. In just a few clicks, you can add furniture, play with lighting, and apply textures. The system helps you pick the right items and arrangements, so you can sidestep those common mistakes that make a tour feel unprofessional. We even have a guide on how to add 3D objects to get you started.
At the end of the day, a well-staged virtual tour of house plans bridges the gap between a blueprint and a dream. It gives clients an emotional connection to the property, helping them move from just seeing a floor plan to truly envisioning their future.
Bringing Your Interactive Walkthrough to Life
You've got your beautiful, virtually staged 3D model. Now for the fun part: turning those static renders into a living, breathing virtual tour of the house plans. This is where we move from design to the technical assembly that lets clients walk through the space from anywhere in the world.
The first move is to generate 360-degree panoramic images from strategic spots inside your 3D model. Picture these as digital bubbles that capture a full, immersive view of a room. You’ll want one for the center of each key area—the kitchen, living room, primary bedroom—and any other spot you really want to show off.
Assembling the Interactive Tour
With your panoramic images ready, it's time to stitch them together using virtual tour software. These tools are the hub where you connect all your separate views into a seamless, walkable journey. Users can then click on arrows or hotspots to move from room to room, just like they would in person.
But a simple walkthrough is just the beginning. This is your chance to add layers of detail that make the experience truly valuable.
Here are a few features I always recommend adding:
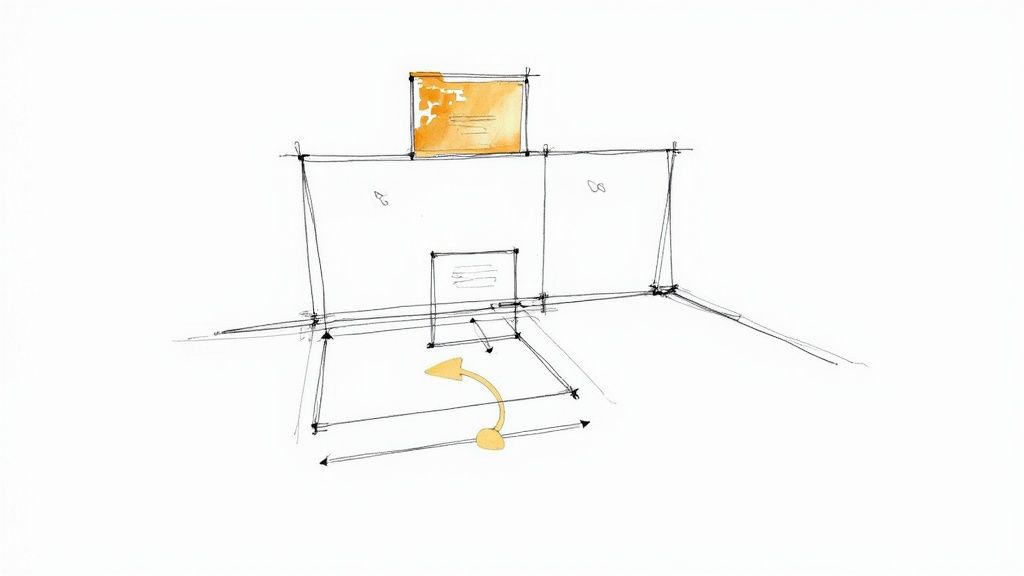
- Info Hotspots: Add clickable icons over things like the kitchen island or flooring to pop up details about the materials or brands used. It’s a great way to answer questions before they’re even asked.
- Integrated Floor Plan: An interactive 2D floor plan tucked in the corner is a game-changer. It helps users orient themselves and lets them jump directly to any room they want to see again.
- Measurement Tools: Some platforms even offer tools that let users measure walls or see if their sofa will fit. This gives them a real sense of the space and how they could live in it.
If you’re working with more complex panoramic setups, a dedicated Marzipano VR host can be a great option for publishing your tour smoothly. We also have a more detailed guide on this whole assembly process right here: https://pedra.ai/help/create-virtual-360-tour.
Sharing Your Tour for Maximum Impact
A virtual tour is a powerful sales tool, but only if people actually see it. The final, critical step is getting it out there. Your goal is to make it incredibly easy for potential buyers or clients to discover and explore the home you've brought to life.
The demand for these experiences is undeniable. The virtual tour market was valued at around USD 11.06 billion in 2024 and is expected to explode to over USD 74 billion by 2030. This isn't just a gimmick; it's how people expect to view property now.
Always embed the tour directly on your website or the property listing page. This keeps people on your site longer and offers a far more engaging experience than a standard photo gallery. Don't forget to share the link on social media either—a quick post on Instagram or Facebook can drive a ton of traffic and spark genuine interest.
Once it's published, you've successfully transformed a flat blueprint into an immersive experience that can close deals.
Got Questions About Turning House Plans Into Virtual Tours?
Thinking about creating a virtual tour from a set of house plans usually brings up a handful of practical questions. Let's tackle the big ones so you can move forward with a clear plan, a realistic budget, and the right expectations. I've heard these questions countless times, so here are the straightforward answers I always give.
How Much Should I Expect to Budget?
This is the big one, and the honest answer is: it varies—a lot. Your costs are directly tied to how you decide to tackle the project.
For the DIY crowd, software is your most affordable path. You can find tools that range from a small one-time payment to a monthly subscription that might add up to a few hundred dollars over the course of the project. This is a solid choice if you have a simple floor plan or you're just trying to keep costs down.
If you bring in a pro, like a freelance 3D artist, you’re looking at a different price range. Expect to invest anywhere from $500 to $2,500. That number gets influenced by everything from the home's square footage and architectural complexity to how much detail you want in the final images and virtual staging.
And for the full-service experience? Agencies that manage the entire process—from modeling to final tour production—will naturally be at the higher end, often charging several thousand dollars for a completely polished, ready-to-share tour.
What’s the Best Software to Use?
There really isn't one "best" tool for everyone. The right software depends entirely on your technical skills and what you need to accomplish.
- For Beginners: If you're new to this, start with user-friendly platforms like Floorplanner or RoomSketcher. They make it pretty simple to take a 2D plan and get a basic 3D model up and running.
- For Professionals: Architects and designers need more muscle. They typically use heavy-hitters like SketchUp, Chief Architect, or Revit to create incredibly detailed and precise models.
- For Putting It All Together: Once your 3D renders are ready, you need to assemble them into a tour. Industry favorites like Matterport, 3DVista Virtual Tour Pro, and Kuula are fantastic for stitching those 360° images into a seamless, interactive experience.
How Long Is This Going to Take?
Your timeline is a direct reflection of the project's complexity.
If you’re working with a straightforward house plan and using DIY software, you could realistically have a virtual tour ready in just a few days.
On the other hand, if you're dealing with a large, custom home full of intricate details and you've hired a professional, the process will take longer. A more realistic estimate is anywhere from one to three weeks. That window covers everything: building the 3D model, applying textures and materials, staging it virtually, rendering all the high-quality 360° views, and finally, building the interactive tour itself.
My biggest piece of advice: Always, always build a little buffer into your timeline for feedback and revisions. I’ve almost never seen a tour get a perfect sign-off on the first try. Having that extra time saves you from a world of stress and last-minute rush fees.
Can I Make Changes After the Tour Is Done?
Technically, yes. But you really don't want to.
Making changes after the final tour is created means going all the way back to the drawing board. You have to open the 3D model, make the architectural adjustments, re-render every single room that was affected, and then re-upload and re-link all the scenes in the tour software. It's a huge pain, and it gets expensive and time-consuming fast.
This actually points to one of the greatest strengths of creating a virtual tour in the first place—it lets you catch design flaws and weird spatial issues before a single nail is hammered. It's far better to finalize your blueprint first and use the tour for confirmation, not for ongoing design changes.
Ready to see how easy this can be? With Pedra, you can turn flat floor plans into stunning, fully-staged virtual tours with just a single click. Generate photorealistic renders, interactive 360° tours, and property videos in seconds. Join over 20,000 real estate professionals who are already selling faster and impressing clients with AI-powered visuals. Start creating with Pedra today.

Related Posts
7 Ways AI for Real Estate Is Transforming the Industry in 2026
Explore how AI for real estate is reshaping the market in 2026: valuation, predictive analytics, vir...
Digital Real Estate Agency: A 2026 Guide to Transforming Your Brokerage
Run a digital real estate agency that closes faster: tools, automation, visual presentation and a st...
8 Facebook Marketing Ideas for Real Estate in 2026
Explore our top 8 Facebook marketing ideas for real estate in 2026. This guide covers paid ads, orga...
Real Estate Floor Plans 2026 - Win More Listings
Master real estate floor plans to win listings and engage buyers. Learn to create and use 2D and 3D ...
10 Home Exterior Renovation Ideas to Boost Curb Appeal in 2026
Discover 10 home exterior renovation ideas to boost curb appeal in 2026, from siding and stone accen...
Home Staging Tips: 8 Ways to Sell a Home Faster in 2026
Looking to sell a property faster and for top dollar? These eight essential home staging tips will s...